sed -i 's/\r$//' filename.shАрхив автора: shilovk
ubuntu run
#!/bin/bash

. /usr/local/rvm/scripts/rvm
service mongodb start
service redis-server start
service ssh start
service mysql start
cd /mnt/c/sites/project
(bash faye_project.sh &)
exec /bin/bash
Autorun many things
- Use chkconfig — about, link
- DaemonController library. It will enable you to auto-start services with your Rails app, starting them if they aren’t already started.
- Create an initializer containing (about):
Thread.new do
  system("rackup faye.ru -s thin -E production")
end-
On Ubuntu, you should use the operating systems’s init system — Upstart.
user@host:~$ cat /etc/init/faye.conf
description "Faye Upstart script"

start on startup
stop on shutdown

respawn

script
    env RAILS_ENV=production

    exec sudo -u deployuser -i /home/deployuser/.rbenv/versions/1.9.2-p290/lib/ruby/gems/1.9.1/bin/rackup /var/www/booko.com.au/booko/faye.ru -s thin -E production
end script
I’m not happy with the method of calling Ruby since it will change. But the advantages are that it will start when the system starts and it will respawn if it dies or you KILL it.
Let Upstart take care of demonising a process and making sure it keeps running
-
Shell script in config/thin_example.sh
#!/bin/sh

set -e

# Feel free to change any of the following variables for your app:
TIMEOUT=${TIMEOUT-60}
APP_ROOT=/home/deployer/apps/example/current
PID=$APP_ROOT/tmp/pids/thin.pid
CMD="cd $APP_ROOT; bundle exec rackup -D -P $PID $APP_ROOT/config/faye.ru -s thin -E     production"
AS_USER=deployer
set -u

startme(){
    run "$CMD"}

stopme(){
    run "pkill -f $PID"}

run (){if["$(id -un)"="$AS_USER"];then
    eval $1
  else
    su -c "$1"- $AS_USER
  fi
}case"$1"in
    start)   startme ;;
    stop)    stopme ;;
    restart) stopme; startme ;;*) echo "usage: $0 start|stop|restart">&2
       exit 1;;
esac
Loosely modified from the unicorn scripts that Ryan Bates used in his VPS deployment railscast (pro only).
Make it executable
chmod +x config/thin_example.shYou’ll need to symlink it to init.d (after chmod +x ‘ing to make it executable)
sudo ln -nfs /home/deployer/apps/example/current/config/thin_example.sh /etc/init.d/thin_exampleThen if you want it to startup with the server
sudo update-rc.d thin_example defaultsOtherwise you should just be able to
/etc/init.d/thin_example [start|stop|restart]. An important point to note is that I’m telling rackup to start in daemon mode (-D) and explicitly setting the PID so I can kill it late
Восстановление загрузки через консоль
войти в консоль через средства восстановления и:
узнать разделы диска:
diskpart
list volume
проверить и исправить ошибки на диске:
chkdsk c: /F /R
проверить систему:
sfc /scannow
исправить ошибки загрузки:
bootrec /fixmbr
bootrec /fixboot
bcdboot c:\Windows
еще есть:
rstrui
dism
Indexes
Fix nessary indexes in code and recreate them:
rake db:mongoid:create_indexes RAILS_ENV=productionPS Before this I had to disable the errors when creating long indexes:
# mongo
MongoDB shell version:2.6.12
connecting to: test
> db.getSiblingDB('admin').runCommand({ setParameter:1, failIndexKeyTooLong:false})
Also may be needed reindex:
Also may be needed reindex:
db.getCollectionNames().forEach(function(collection){db[collection].reIndex()});
route ipconfig tracert
route /print
ipconfig /all
winmtr
tracert
Для ускорения процесса используйте параметр -d. В этом случае не будет происходить определения символических имен промежуточных узлов по их IP-адресам.
Используйте параметр -h для увеличения максимально возможного числа хопов, если цель не была достигнута за 30 прыжков (значение данного параметра по умолчанию).
При наличии большого количества ошибок на промежуточных узлах, увеличьте время ожидания ответа о них, используя ключ -w.
pathping ip из tracert
traceroute
route ADD 192.168.0.0 255.255.255.0 192.168.0.254
192.168.0.0 — локальная сеть
255.255.255.0 — маска
192.168.0.254 — шлюз
и попробуйте запустить трасировку
Перенаправить почту root’а на email
Проблема такая: все уведомления от сервисов падают в локальный ящик рута: /var/spool/mail/root, а требуется, чтобы они уходили на внешний почтовый ящик. Для этого открываем файл: /etc/aliases, ищем внизу строку «#root: marc» и заменяем её на: «root:nrg@domain.ru». После изменений необходимо запустить программу newaliases, чтобы перестроить таблицу алиясов сендмыла. Теперь для очистки мусора из системы можно очистить файл /var/spool/mail/root.
Теперь отправляем почту руту: echo `hostname` | mail -s `hostname` root и ждём этого письма на указанном ящике 
link_to with params
The simplest form
The most common and straightforward way of using link_to is to create a barebones (no magic) link. So, assuming your root route points to ‘/’, the way you would use the helper is:
<%= link_to "Home", root_path %>
# => <a href="/">Home</a>
Link-ing to a resource
Another common variant is linking to a resource (a user’s profile for example). Let’s say the user’s model is called User and that a@user ivar points to the user record who’s id is 1. Creating a link to the user’s profile will look like the following:
<%= link_to "Profile", user_path(@user) %>
# => <a href="/users/1">Profile</a>
There’s also a shorter version that will do the same thing. It’s got some magic to it (like most things in Rails) but it also looks prettier and there’s less to type (two stones with one bird).
<%= link_to "Profile", @user %>
# => <a href="/users/1">Profile</a>
Using link_to with a block
This is somewhat of a lesser known/used option of link_to but it’s useful nonetheless and it also makes the code more readable. So in those cases where the link text is long and/or ugly, or it doesn’t really fit on a 80 chars line, you can pass the link text inside a block.
To make the example more obvious, I’m gonna do a before and after kind of thing.
Before: ruby <%= link_to "<span class='home-link'>Home</span>".html_safe, root_path %> # => <a href="/"><span class="home-link">Home</span></a>
After: ruby <%= link_to root_path do %> <%= content_tag :span, "Home", :class => "home-link" %> <% end %> # => <a href="/"><span class="home-link">Home</span></a>
In this case I’ve purposely chosen a less uglier link text, but usually the link text will be something like an image tag or a span with an icon inside it (or any other ugly html code you can think of).
Adding html classes and/or id to your link
Another very common task you’ll use is to add a html class or id to your links.
<%= link_to "Section", root_path, :class => "my-class", :id => "my-id" %>
# => <a href="/" class="my-class" id="my-id">Section</a>
How to delete a record with link_to
Calling the destroy action of a REST-ful controller requires aDELETE request and that can be easily achieved by passing the:method => :delete hash as an option to the link_to helper.
<%= link_to "Remove", @user, :method => :delete %>
# => <a rel="nofollow" data-method="delete" href="/users/1">Remove</a>
Note that the rel="nofollow" is auto-magically added by Rails as an SEO bonus.
Require confirmation for deleting a record
You will probably want some sort of confirmation when removing objects to prevent accidental deletes. The easiest way to add that is with a simple javascript alert box that will ask the user to confirm his delete request.
<%= link_to "Remove", @user, :method => :delete, :data => {:confirm => "You Sure?"} %>
# => <a data-confirm="You Sure?" rel="nofollow" data-method="delete" href="/users/1">Remove</a>
Link-ing to an image with link_to
It might be that you want to make your links prettier or that you want to have some nice buttons, or even a logo click-able or whatever the reason for using click-able images is, you’ll want to add your image inside the link. Making an image link-able is pretty straight forward. Just add the image_tag where the link text would go and you’re done.
<%= link_to image_tag('logo.png'), root_path %>
# => <a href="/"><img src="/assets/logo-c88948e05e11587af2c23747862ca433.png" alt="Logo"></a>
You can also pass the image in a block if you like that style better.
<%= link_to root_path do %>
  <%= image_tag('logo.png') %>
<% end %>
# => <a href="/"><img src="/assets/logo-c88948e05e11587af2c23747862ca433.png" alt="Logo"></a>
A nice side-effect of using the image_tag helper is that it will add the asset digest to your image.
Adding an alt attribute to the image
As you’ve seen in the previous example, I didn’t specify an alt attribute but the link_to helper generated one. The generated alt tag is just the name of the image file, capitalized. In case you want (and you should want) to override the alt attribute, it’s very easy to do; just add your own alt attribute like so:
<%= link_to image_tag('logo.png'), root_path, :alt => "MyLogo" %>
# => <a href="/"><img src="/assets/logo-c88948e05e11587af2c23747862ca433.png" alt="MyLogo"></a>
Alt attributes are beneficial for SEO purposes and they also aid those visitors who use text readers or non graphical browsers.
Link-ing to an image
There are times when you might want to link to an image (not necessarily with an image). This can be confusing because you need your image to contain the image digest generated by the asset pipeline. There’s a helper that provides just that and it’s called image_path.
<%= link_to "Logo", image_path('logo.png') %>
# => <a href="/assets/logo-c88948e05e11587af2c23747862ca433.png">Logo</a>
Anchors with link_to
You might need to point to a specific section (anchor) in the page which you can identify by it’s dom ID. So let’s say on the target page we have a section that has the id="interesting-section". In order to point our link to that section, we’ll need to add the anchor to the generated link.
<%= link_to "Section", root_path(:anchor => "interesting-section") %>
# => <a href="/#interesting-section">Section</a>
Ajax links with link_to remote
You can add the :remote => true option to the link to tell Rails that you want to handle the link via javascript. This option will automatically send an ajax request (handled via the jQuery UJS adapter).
<%= link_to "Ajax", root_path, :remote => true %>
# => <a data-remote="true" href="/">Ajax</a>
Opening the link in a new tab or window
For a good user experience and because you’ll want your user not to leave your website if possible, you should make all your external links open in a separate tab or window. You can achieve this by using the target="_blank" html attribute which in Rails speak will look like this:
<%= link_to "Google", "http://google.com", :target => "_blank" %>
# => <a target="_blank" href="http://google.com">Google</a>
POST-ing using link_to
Sending a post request via a link is something that the html <a href> cannot do. You can only use it to make GET requests, notPOST. That being said, Rails has some magic tricks for you.
By providing the :method => :post option, Rails will create a form and submit it via javascript. Note that you need the jquery-railsgem for this to work, if you don’t have it, there won’t be any magic happening and your links will default to a GET request.
<%= link_to "Post", root_path, :method => :post %>
# => <a rel="nofollow" data-method="post" href="/">Post</a>
Adding more params to the POST request
<%= link_to "Create User", users_path(:email => "jdoe@email.com", :password => "secret"), :method => :post %>
# => <a rel="nofollow" data-method="post" href="/users?email=jdoe%40email.com&password=secret">Create User</a>
Conclusion
These are some of the more common ways I’ve used link_to but I’m sure there are many others. So if you have any other examples I could add to the article please let me know in the comments section below.
Migrate http to https in wordpress
link
Configuring WordPress for SSL/HTTPS
Links in WordPress (such as image attachments, themes CSS and JavaScript files) are relative to the install URL.
To change WordPress from HTTP to HTTPS, the install URL must changed from sayhttps://designmodo.com to https://designmodo.com.
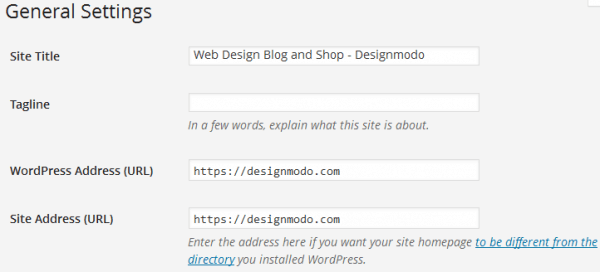
- Login to your WordPress dashboard and navigate to Settings > General.
- Ensure that the WordPress Address (URL) and Site Address (URL) are
https. If not, addSafter http to makehttpsand save it.
To easily enable (and enforce) WordPress administration over SSL, the constantFORCE_SSL_ADMIN should be set to true in your site’s wp-config.php file to force all logins and all admin sessions to happen over SSL.
|
1
|
define('FORCE_SSL_ADMIN', true); |
The constant FORCE_SSL_ADMIN can be set to true to force all logins and all admin sessions to happen over SSL.
If your WordPress site uses a content delivery network (CDN) to serve its components (images, JavaScript, CSS style sheet), ensure the URLs are all https:// otherwise your website will be deem insecure by the web browser.
What’s Next?
Now that we’ve successfully moved WordPress to HTTPS, we still need to do two more things — set up a 301 permanent redirect and inform Google of the URL change.
To setup a 301 permanent redirect, FTP/SFTP to your server and add the code below at the top of WordPress’ .htaccess file.
|
1
2
3
4
|
RewriteEngine onRewriteCond %{HTTP_HOST} ^yoursite.com [NC,OR]RewriteCond %{HTTP_HOST} ^www.yoursite.com [NC]RewriteRule ^(.*)$ https://www.yoursite.com/$1 [L,R=301,NC] |
Change every instance of yoursite.com to your WordPress URL.
To inform Google about the change in URL, re-add your WordPress site to Google webmaster tool (but this time with https://) and follow this this guide to let Google know about the change of URL.
You can check your SSL website status using Qualys SSL Labs.
ftp centos
В качестве FTP сервера будем использовать VSFTPD
Справка
vsftpd (англ. Very Secure FTP Daemon) — FTP-сервер с поддержкой IPv6 и SSL.
Является FTP-сервером по умолчанию многих операционных систем, и обслуживает официальные репозитории ftp.debian.org, ftp.redhat.com,[1]ftp.openbsd.org, ftp.freebsd.org. А так же используется на официальном FTP ядра Linux[1] [2]
http://ru.wikipedia.org/wiki/Vsftpd
Приступаем к установке
yum install vsftpd
По окончании установки отредактируем конфиг нашего будущего FTP сервера
mcedit /etc/vsftpd/vsftpd.conf
Конфиг файла довольно легко читаем. Большинство параметров так и оставляем без изменений. Ниже я укажу лишь то, что нам нужно отредактировать или добавить.
anonymous_enable=NO
Запрещаем анонимным пользователям использовать наш сервер.
chroot_local_user=YES
Добавляем эту запись в конфиг, что бы запереть пользователя в своей домашней директории
На этом, все операции с конфигом закончены. Запускаем наш сервис
service vsftpd start
Добавляем его в «автозагрузку»
chkconfig vsftpd on
Теперь, нам необходимо добавить пользователя который, собственно и будет использоваться для подключения к FTP.
useradd FTPuser
(где FTPuser - ваш пользователь для FTP)
Задаем пароль для этого пользователя
passwd FTPuser
И напоследок, немного «поколдуем» над правами этого пользователя. Ведь нам совсем не нужно, что бы этот юзер входил на сервер по SSH. Поэтому внесем изменения в файл /etc/passwd
mcedit /etc/passwd
Находим в этом файле следующую запись
FTPuser:x:501:501::/home/FTPuser:/bin/bash
И заменяем /bin/bash на
/sbin/nologin
Здесь же мы можем поменять домашний каталог этого пользователя (/home/FTPuser) на любой другой (например /VAR/FTP)
В итоге получаем следующий файл
FTPuser:x:501:501::/home/FTPuser:/sbin/nologin